Cutting your dog's nails is an essential part of their grooming routine. Overgrown nails can be uncomfortable and even painful, so regular nail maintenance is vital.
Did you know that, over time, unkempt nails can do serious damage to your dog? When nails are so long that they touch the ground, they exert a force back into the nail bed, creating pain for your dog and putting pressure on the toe joint. Imagine walking around wearing really tight shoes. Pretty uncomfortable, right?
Overgrown nails can turn a normal healthy paw into a splayed foot and reduce traction. If left long for an extended period, long nails can cause deformed feet and even impact your dog’s whole posture. Long nails can also tear or split, which, as well as being painful, could mean a trip to the vet.
Yet not every dog naturally embraces the idea of having their paws pampered. Some even find it pretty scary! If your dog would rather give that pedicure a miss, it can make cutting your dog’s nails something both you and your dog would prefer to avoid.
The good news is that there are so many super solutions to help your dog overcome their dislike of nail-trimming - and learn to participate willingly in the experience.
While it might seem daunting, with a little patience and the right foundations you can easily master the art of how to cut your dog’s nails and make nail trims the best possible experience for you and your dog!
Nailed It! Concepts for Nail Cutting Success
Before we dive into some top tips on how to cut your dog’s nails, let’s explore the concepts your dog needs for nail cutting success. Concepts are the building blocks we teach our dogs. Concepts are areas of their personality where they might need a skill up. If we can help our dogs to skill up then it makes the whole training process so much easier for them!
When cutting your dog’s nails there are two key concepts we know that they need to strengthen.
Concept for Nail Cutting Success Number One - Optimism and Confidence
Think of all the different elements that form part of a nail trimming experience:
- Handling - by you or sometimes by a stranger.
- Noise - grinders and clippers can make novel and often quite loud noises.
- Vibrations - grinders not only make noise, they also vibrate close to your dog’s paws and nails.
It takes a pretty optimistic dog not to be phased by all that novelty.
Does your dog need more confidence and optimism around novel things?
Did you know that you can boost your dog’s optimism by playing fun three-minute games at home? If you’ve Ditched the Bowl this is a brilliant way to use some of your dog’s daily food allowance and have awesome fun at the same time - all while growing your relationship with your dog!
Concept for Nail Cutting Success Number Two - Calmness
For your nail trimming to be safe and stress free, it will be important for your dog to be able to hang out calmly without wriggling or shuffling. It’s much harder to cut your dog’s nails if they are fidgeting or wriggling, and you will risk a slip of the clippers or grinder.
As with any area of life, Calmness is King! Promoting a calm mindset will allow your dog to go through life with a much emptier stress bucket and have a much greater capacity to deal with events they do find worrying or stressful.
Don’t underestimate the value of knowing How to Teach Your Dog to be CALM and SETTLED!
It's really important to acknowledge that calmness should never be mistaken for passive helplessness. Your aim is not to have your dog stand rigid out of fear or obedience while you cut their nails. Willing participation is fundamental to a positive, consent-based nail cutting experience.
The great news is that you can teach your dog to engage willingly in the experience of having their nails cut - and give them a clear way of telling you when they are feeling uncomfortable.
This fun game will also prepare you and your dog for Vet Visit Success!
Let’s Play: OK GO!
This game can be truly powerful when it comes to teaching your dog to be comfortable being handled and to actively participate in the process. All you need is an empty food bowl, your dog, and something super tasty that your dog is going to enjoy.
Step 1
With your dog in a standing position, begin by building lots of value for your bowl by dropping pieces of food into it for your dog to eat.
Step 2
Once your dog has value for the bowl, apply a gentle restraint (hold your dog by their collar or harness, or pop a hand on their chest), place a piece of food in the bowl, invite your dog to get the food with a verbal “OK… Go!” cue, pause, then release your dog to the food. Repeat!
Step 3
After a few rounds of building that desire and powering up that drive to the food bowl, you can start to ask for a little more duration. Drop food in the bowl, release the restraint on your dog’s collar or harness and pause momentarily before inviting them to get it. Do they wait and listen for the “OK… Go!” cue, even if the temptation to dive right in is really strong?
Before you can move this game on and incorporate it into your handling and nail care sessions, you need your dog to be able to offer a level of impulse control around the bowl, and to be able to maintain forward focus on that bowl, while waiting for permission to dive in for the food - and it needs to be a really good deal!
Begin with lots of quick repetitions and gradually increase the amount of time you wait before you release your dog to the food so you are building duration into that forward-focused stare at the bowl.
Step 4
Now you’re going to add some movement. Can your dog continue to offer forward focus and impulse control if you move an arm towards them, or hover your hand over their back, and still only release forwards to the bowl of food when invited?
You might need to build this up slowly and start with really subtle movements, especially if you have a dog who is wary of hands coming towards them.
Don’t be in a rush to move on from this level. This game is truly transformational, but getting a solid foundation in place is vital to future success. Rush this part and the rest will probably fall apart!
Step 5
You’re now going to add touch. This is where your game starts to incorporate handling. Once your dog is rock solid with the earlier levels and you can move your hands and arms around, over and near their body while they continue to maintain forward focus on that bowl - and they are waiting for your “OK… Go!” cue, the next stage is to add touch.
Initially, it may be a brief and gentle stroke along your dog’s back, working up to lifting a paw, or examining an ear. The key here is that touch means you are going to release your dog forward to the food reward. One becomes a predictor of the other.
This game is so powerful because the forward focus on the bowl gives your dog a job - something to do while they are being handled. The pressure release comes from the movement forward as they are released towards the bowl and the food reward it contains! This adds the element of fun, as well as giving your dog some control - and crucially incorporates movement, which boosts your dog’s optimism.
Really important: If at any point your dog leaves the game, walks away, takes their focus off the bowl or gives you another indication they are uncomfortable - you should reward (feed) them regardless – otherwise you will actually be punishing your dog’s choice to communicate. Give them a break and come back to it later.
The real magic
Between repetitions, balance up your more static forward-focus handling game with some ‘power poses’' to really maintain that positive mindset before you come back for another round of handling and forward focus. A power pose is usually a game or behaviour involving movement, that helps your dog feel like a superhero! Your dog might enjoy:
- Spins
- Food chasing
- Leg Weaves
As you work through the levels of this game you will find that your dog’s outlook on being handled is transformed - and most importantly, you’ve achieved that as a team!
Top Tips for Nail Cutting Success
You can set your dog up for success when it comes to nail cutting with our top ten tips!
How To Cut Your Dog’s Nails Tip 1: Choose the right equipment
Before you cut your dog’s nails, it’s important to make sure you have the right tools for the job, and know how to use them.
Your choice of equipment will depend on the size and thickness of your dog’s nails - as well as your own confidence and technique - so doing some research and seeking the advice of an expert is a great idea.
You may choose to use clippers to cut through the nail, or you might prefer to use a grinder to shorten your dog’s nails.
Clippers are quicker, while you’re less likely to make an accidental cut with a grinder.
Keep in mind that it can take some dogs time to get used to the sounds and vibrations of a grinder, so always go at your dog’s pace, and be sure your dog is comfortable around your equipment and feels in control of the experience.
Whether you opt for clippers or a grinder, regular maintenance of your equipment is essential to make the experience as pleasant and stress-free as possible. A pair of blunt clippers will squeeze painfully rather than cutting cleanly through your dog’s nail. Blunt grinders will cause too much heat to build-up. If your dog learns to be wary of your equipment because it has caused unnecessary discomfort, your next session is likely to go much less smoothly!
How To Cut Your Dog’s Nails Tip 2: Get to know your dog’s nails
A dog’s nail consists of the living pink quick and the hard outer material called the shell. The quick runs through the core and supplies blood to the nail.
If your dog has light coloured nails you might be able to see the quick running through the centre. This is much harder if your dog has dark pigment in their nails.
Whenever you’re cutting your dog’s nails, it’s really important to avoid cutting into the quick, as this can cause pain and bleeding.
Equally important is the direction of your cut, as we explain below.
How To Cut Your Dog’s Nails Tip 3: Cut your dog’s nails the right way
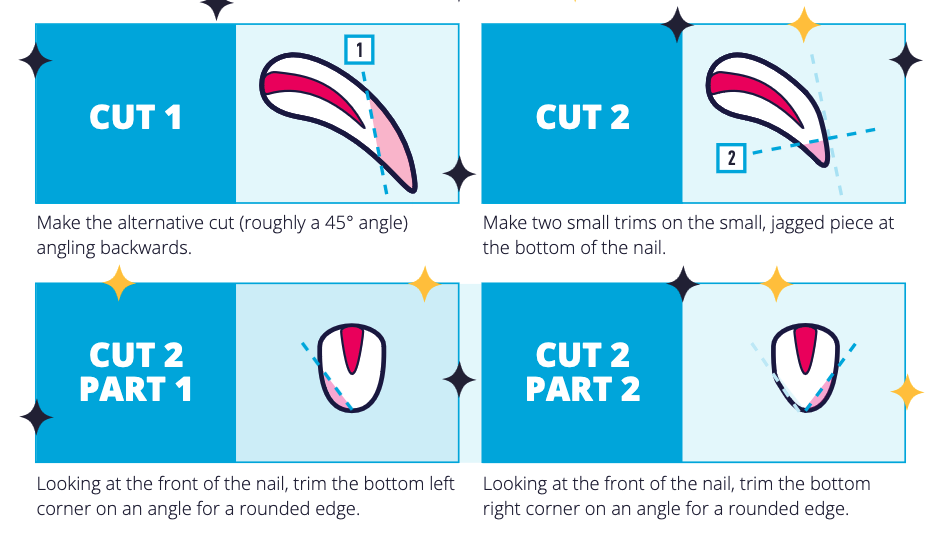
While you will inevitably come across many and varied opinions on the subject, we believe the alternative cut line is the best method for cutting your dog’s nails.
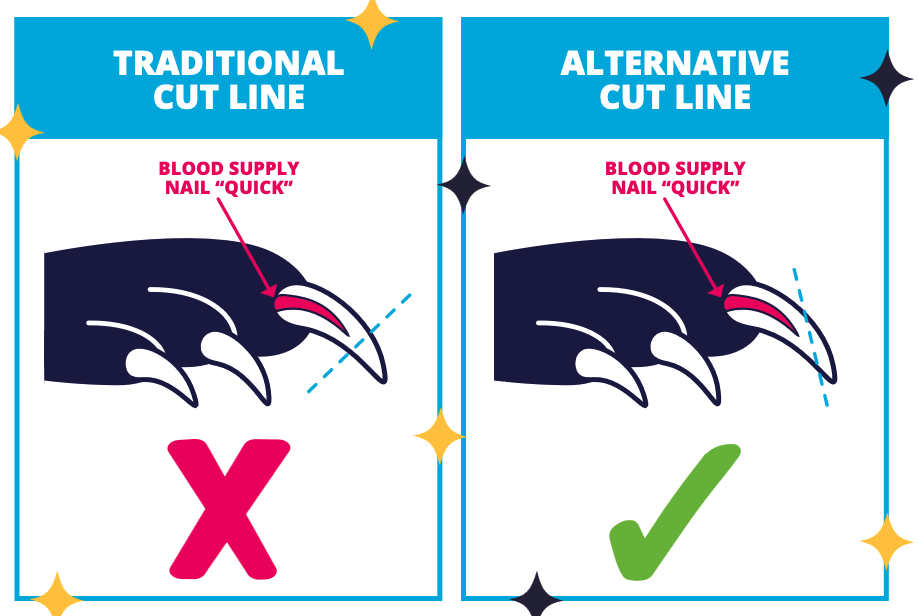
On the graphic above you will see the “traditional cut line” on the left and the “alternative cut line” on the right.
When you use this alternative cut line, you are far less likely to clip the quick and hurt your dog.
Not only that, the pressure of your clippers is pressing down onto the firmest part of the nail shell rather than squeezing the nails in from the side, which puts way more pressure on the nerve running through the centre.
How To Cut Your Dog’s Nails Tip 4: Create positive pairings
Introduce your dog to the clippers or grinder gradually.
Let them sniff and explore the tools, rewarding them with some of their daily food allowance and lots of verbal encouragement to create positive associations.
Using a lickable Calm Mat can be helpful while trimming your dog’s nails. By associating a positive, calm activity with nail trims, your dog can enjoy their treat while you work.
If your dog seems anxious, lots of short, fun sessions will be important to build that positive association slowly without overwhelming them.
How To Cut Your Dog’s Nails Tip 5: Gradual introductions
When you do introduce your dog to the clippers or grinder, take it slowly.
If you’re working on building your dog’s confidence and optimism about having their nails cut, it is always worth focusing on the experience over the end result.
If you manage to cut one nail, but make it an amazingly positive experience, how much more is that going to set your dog up for success next time? They might look a little wonky, but when you look at the bigger picture, that is so much better than a stressful experience where the focus was on the end result.
How To Cut Your Dog’s Nails Tip 6: Keep your dog moving
Remember that while a calm mindset is the very best state for your dog to exist in, movement is empowering and can help them feel much more optimistic about situations they find challenging or worrying.
Get your dog chasing pieces of food across the floor as you turn the grinder on and back off, or while you introduce the clippers. By keeping them moving and getting them ‘power posing’, you are going to build a much more optimistic response to the sound and sight of your nail cutting equipment than if they were static.
Make sure you keep any nail cutting sessions short, and give your dog lots of breaks where they get to move.
How To Cut Your Dog’s Nails Tip 7: Be patient
Patience is key, especially if your dog is nervous or is finding the experience challenging.
Take breaks if needed and never force your dog to continue if they seem stressed or worried.
Building trust and keeping the experience positive will make future nail trimming sessions easier.
How To Cut Your Dog’s Nails Tip 8: Regular maintenance
How frequently you need to cut your dog’s nails will depend on their activity level and the surfaces they walk on, but regular maintenance will prevent overgrowth and make the process more manageable.
How To Cut Your Dog’s Nails Tip 9: Be First Aid ready
Accidents happen! If you accidentally cut the quick, remain calm.
If you do accidentally cut your dog’s nail too short and cause an injury, stay calm. Don’t make it into a big event. It’s happened; take a big breath and deal with it.
Have a styptic pencil or powder on hand. You can purchase these from your local chemist or pet shop. The primary ingredient, aluminium sulphate, works by constricting the blood vessels so they’ll stop bleeding, allowing the cut to close quickly.
An alternative is to apply pressure for a few minutes to allow clotting. During either procedure, reassure your dog and feed, feed, feed!
If the bleeding persists or seems severe, contact your vet for advice.
How To Cut Your Dog’s Nails Tip 10: Scratchboard fun: Teach your dog to file their own nails!
One great alternative to clippers and grinders is to turn your dog’s nail cutting into a game and teach them to use a scratchboard.
This is such a fun way to help your dog shape their nails and keep them short, without the potential stress of using clippers and grinders - whilst also boosting their confidence and optimism with something that’s quite novel to touch and sounds novel too!
You can learn this and many more awesome handling and grooming tips in our Sighthounds course!
Nailed it!
Trimming your dog's nails can be a positive experience, and one your dog participates in willingly.
With a patient approach, positive reinforcement, and the right tools, you can keep your dog's nails at a healthy length and avoid potential problems.
Remember to be gentle, take your time, and consult your vet if you have any concerns.
Happy nail trimming!